CNC / CHIP CONTROL — Part 1 of 3
Reading Your Chips: What the Swarf Is Telling You
Mateusz Żuławski
CNC Programmer Setter Operator at Newby Foundries
≈ 5 min read
Chip shape, colour and consistency can reveal a lot about what is happening in the cutting zone. Learn to recognise six common chip patterns and understand what to investigate next.
Chips are more than waste material.
They are one of the most immediate forms of feedback available to a CNC machinist. Their shape, thickness, colour and consistency can provide useful clues about cutting conditions, chip evacuation and process stability.
A good machinist does not look at a chip in isolation. They connect what they see with the material, tool geometry, cutting parameters, coolant strategy and the operation being performed.
Here are six common chip conditions worth recognising.
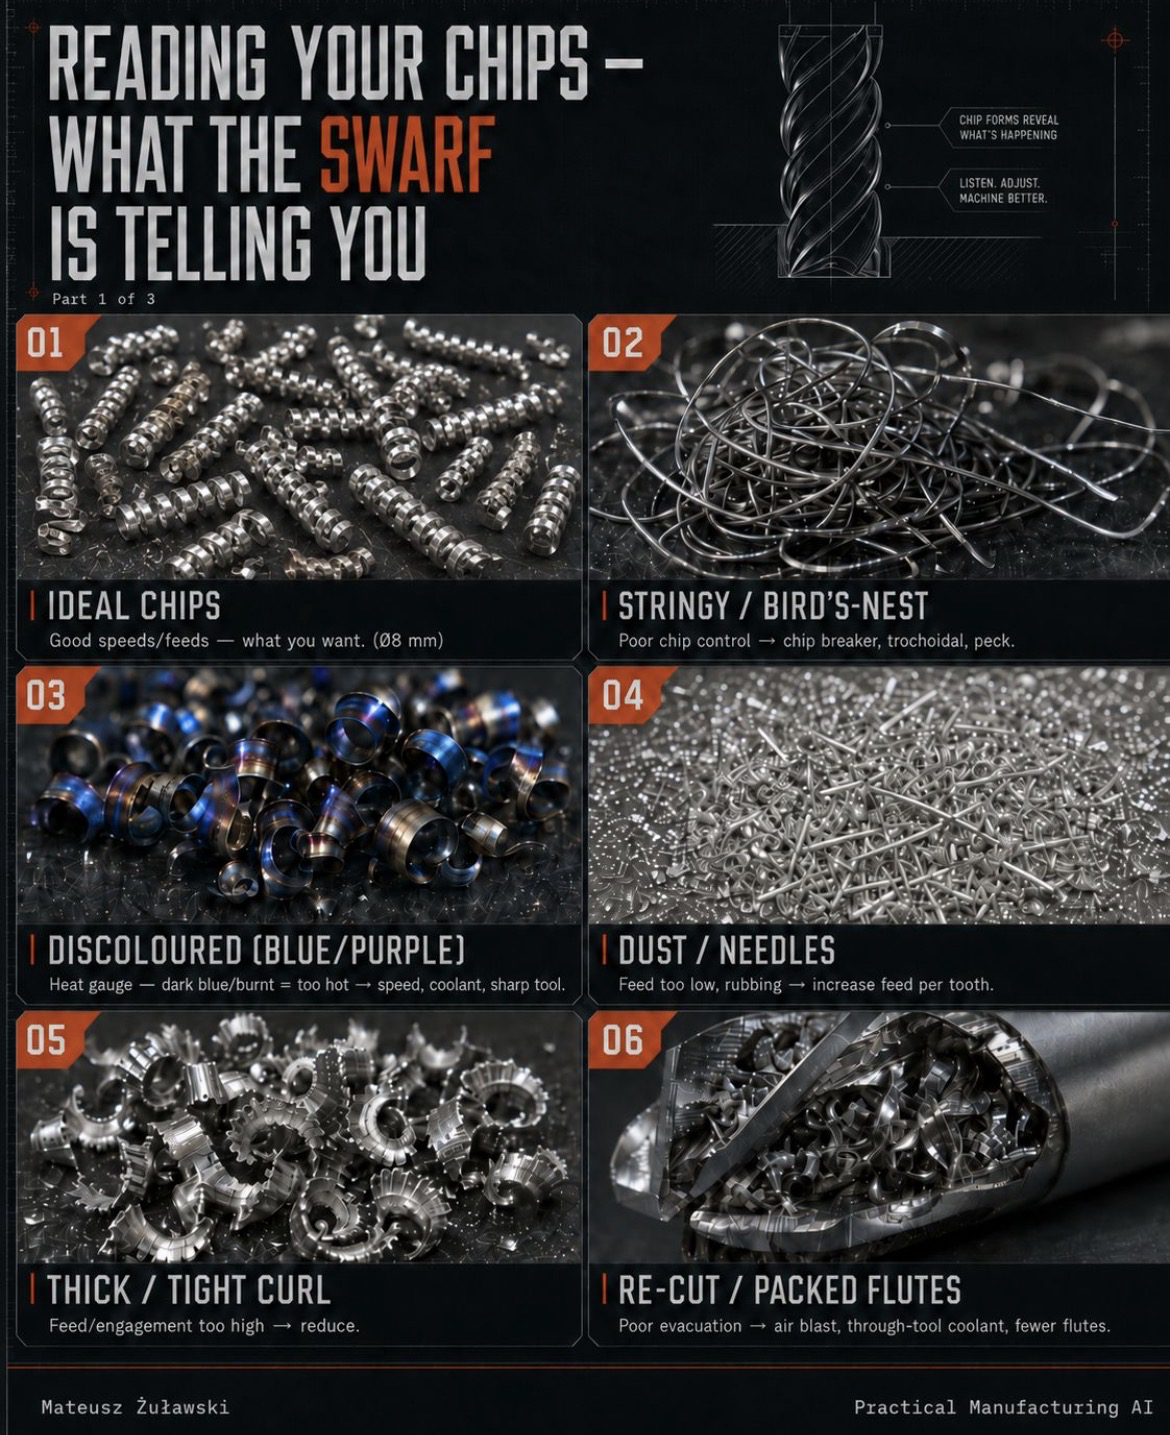
01 — Ideal chips
Short, controlled chips are generally desirable because they are easier to evacuate and less likely to wrap around the tool or workpiece.
They can indicate a suitable combination of:
- Cutting speed.
- Feed per tooth.
- Tool geometry and chipbreaker design.
- Material behaviour.
- Cutting engagement.
However, the ideal chip shape depends on the material and operation. A short chip is not automatically proof of a perfect process.
The objective is controlled chip formation and reliable evacuation.
02 — Stringy chips / bird’s nest
Long, continuous chips can wrap around the tool, workpiece or fixture.
This creates risks for surface damage, tool interference and operator safety.
Possible causes include:
- Insufficient chip breaking.
- Tool geometry unsuitable for the material.
- Incorrect feed or cutting engagement.
- An operation that produces continuous chips.
- Poor chip evacuation.
Possible actions:
- Use a tool with an appropriate chipbreaker.
- Review feed and depth of cut.
- Consider a trochoidal or other suitable toolpath.
- Use a pecking strategy where appropriate.
- Improve chip evacuation.
Do not assume that every long chip is a problem. Some operations naturally produce continuous chips. The important question is whether they remain controlled and leave the cutting zone safely.
03 — Discoloured chips (blue / purple)
Chip colour can provide clues about thermal conditions, particularly when machining steels and other materials where oxidation produces visible colour changes.
Dark blue or purple chips may indicate significant heat generation, but colour is not a universal temperature measurement.
Interpret it in context:
- Material and alloy.
- Cutting speed and feed.
- Coolant delivery.
- Tool condition and wear.
- Chip thickness and contact time.
If overheating is suspected, investigate cutting speed, coolant or lubrication, tool sharpness and cutting conditions.
Do not reduce speed automatically without understanding the cause.
Important: chip colour behaves differently across materials. Aluminium chips do not provide the same reliable colour-based temperature indication as many steel machining applications.
04 — Dust / needles
Very small chips, powder-like material or needle-shaped fragments can indicate an unfavourable cutting condition.
Possible causes include:
- Chip thickness that is too small.
- Rubbing instead of effective cutting.
- Incorrect feed per tooth.
- Tool geometry or edge condition.
- Brittle material behaviour.
- A finishing operation designed to produce very small chips.
If feed per tooth is too low and the tool is rubbing, increasing feed may help restore effective cutting.
However, do not increase feed blindly. Check the tool manufacturer’s recommendations, material, engagement and machine capability first.
05 — Thick / tight curls
Thick or tightly curled chips can indicate high chip thickness, high engagement or chipbreaker geometry producing a compact curl.
Possible causes include:
- Excessive feed per tooth.
- Excessive radial or axial engagement.
- Incorrect cutting parameters.
- Tool geometry unsuitable for the operation.
Depending on the application, reducing feed or engagement may improve the result.
Also check whether the chipbreaker is appropriate for the material and the intended chip thickness.
A tight curl is not automatically a defect. Some chipbreaker geometries are designed to produce compact, controlled chips.
06 — Re-cut chips / packed flutes
When chips cannot leave the cutting zone, they may be cut repeatedly or accumulate in the tool flutes.
This can lead to:
- Increased friction and heat.
- Surface damage.
- Unstable cutting forces.
- Accelerated tool wear.
- Tool breakage in severe cases.
Possible actions include:
- Improve external air blast.
- Use through-tool air or coolant where suitable.
- Review toolpath and entry direction.
- Check pocket geometry and chip exit routes.
- Consider a cutter with fewer flutes and more chip space.
- Review radial and axial engagement.
The right solution depends on the machine, tool, material and operation.
What should you do when the chips look wrong?
Use a systematic approach rather than changing several parameters at once.
- 1. Identify the material and operation.
- 2. Inspect the chip shape, colour and consistency.
- 3. Check the tool geometry and cutting-edge condition.
- 4. Review feed per tooth, cutting speed and engagement.
- 5. Check coolant or air delivery.
- 6. Observe whether chips are leaving the cutting zone.
- 7. Change one relevant variable at a time and verify the result.
A chip is a useful process signal, but it is not a complete diagnosis.
Final takeaway
The chips tell a story about the cutting process.
Stringy chips may point to poor chip control. Very small chips may indicate rubbing or low chip thickness. Packed flutes may reveal an evacuation problem. Discolouration can provide clues about heat, depending on the material.
The key is to connect the chip pattern with the actual machining conditions.
Observe the chips. Understand the cause. Adjust the process.
Question for CNC machinists:
Which chip condition causes you the most trouble in production — stringy chips, packed flutes, excessive heat or something else?
#CNC #Machining #Swarf #ChipControl #Manufacturing #PracticalManufacturingAI